
Recently I had to create an informative communication site with multiple pages divide in multiple “chapters”. And because of vast number of pages I didn’t want to use the standard top or left navigation, I wanted something more elaborate and I had the following prerequisites:
- New pages should be added automatically whenever a new page gets published
- Pages and Chapters should be shown in the order of my choosing
- Page-level security should be maintained
- Updates to the menu should be applied to all pages quickly, in other words, I don’t want to update 40 individual pages just because I changed the menu.
My first idea was to create a list to which I could apply a format. Luckily, I quickly realized that this list would simply be a copy of all the pages in my Site pages library.
So instead of creating a separate list, I started to adapt the Sitepages library itself.
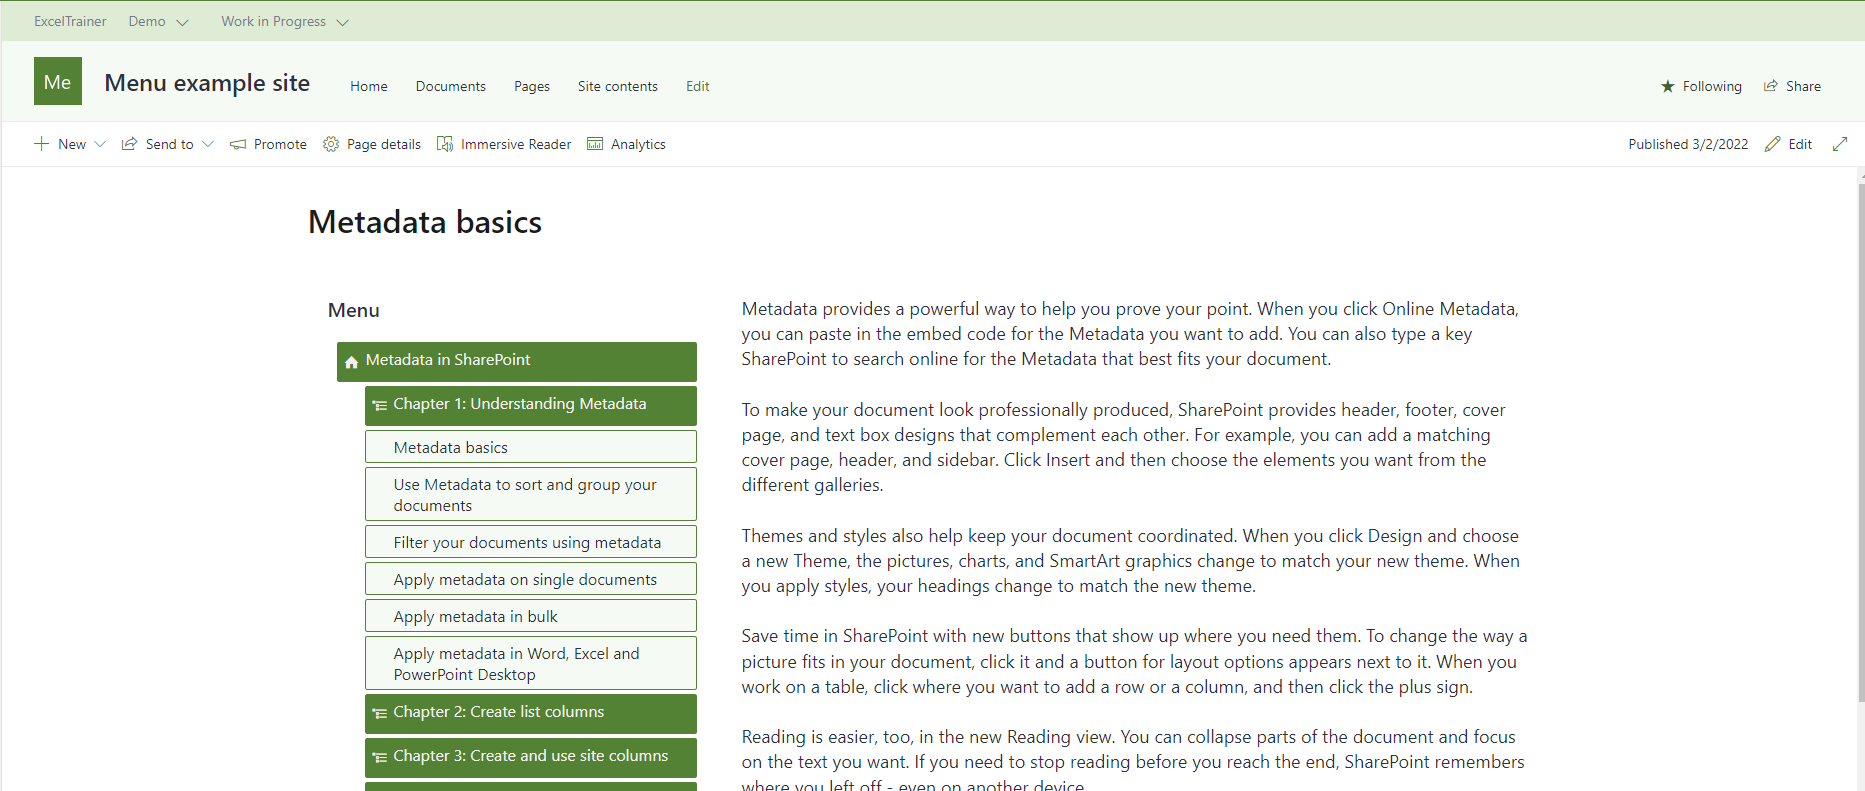
Before I show you how to build, integrate and maintain the menu, let me first show you the final result. As you can see in the image below, there are 3 levels of pages:
- there is one starting page “Metadata in SharePoint”,
- there are multiple pages marking the beginning of a chapter, I will refer to these pages as Chapter-pages,
- and in each chapter, there are multiple content pages, to which I refer as Content-pages (the image shows only the Content-pages in the current chapter).
Setup
The key element of this concept is that the menus are views on the Site pages library. To be precise, there will be one view for every chapter allowing that chapter to be expanded.
The bare minimum for this to work are two columns “PageOrder” and “ChapterOrder”, both numerical columns.
- ChapterOrder is the number of the chapter to which a Chapter-page or Content-page belongs to.
- The PageOrder number is the relative number of each page inside the chapter it belongs to.
- The Chapterpages always have the PageOrder value 0. Actually this is the only way Chapter-pages are distinguised from Content-pages.
Adding Columns
- Add columns
- Tell me how
Column: PageOrder
- Type: Number, no decimals, default 99.
- The number indicates the order of the page inside its chapter.
- The PageOrder value of a Chapter-page is always 0.
- The default value makes sure that new pages are always listed at the bottom of the list.
Column: ChapterOrder
- Type: Number, no decimals, no default.
- The number indicates the order of the chapter.
- The number is used by both Chapter-pages as Content-pages.
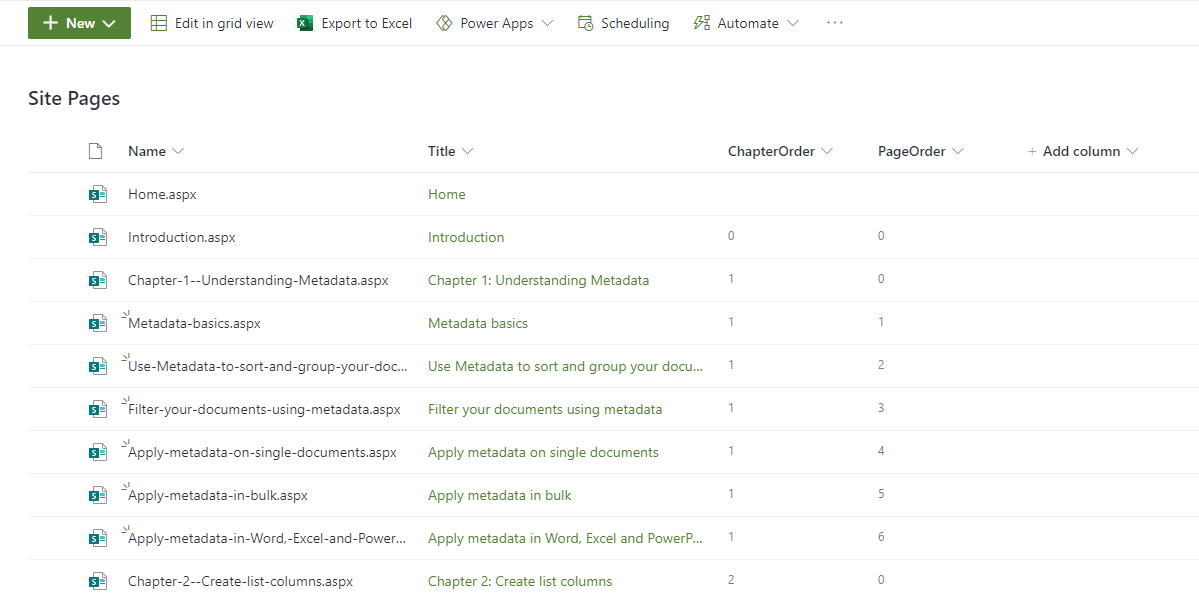
Go to the Site pages library
- Click on the Gear button and select Site contents
- Click on Site pages
Add the PageOrder-Column
- Click on Add column and choose Number
- Type the name “PageOrder”
- As Number of decimal places select 0
- As Default value enter 99
- Click on Save once you are ready
Add the ChapterOrder-Column
- Click on Add column and choose Number
- Type the name “ChapterOrder”
- As Number if decimal places select 0
- No default value
- Click on Save
Create the views
Once the columns are created, make sure that there are some dummy pages, allowing you to see the impact of the views.
For every chapter you can now create a view that will expand the pages in that specific chapter, in this example I will name it “Chapter # expanded”, but any name will do of course.
- Create views
- Tell me how
“Chapter 1 expanded”-view
- Name: “Chapter 1 expanded”
- Visible columns: Title, Name, ChapterOrder and PageOrder
- Sort by: ChapterOrder ascendingly and PageOrder also ascendingly
- Filter: PageOrder is equal to 1 AND Chapter is not empty
Go to the Site pages library
- Click on the Gear button and select Site contents
- Click on Site pages
- Click on the default view, most likely “By Author” and choose Save view as
- Enter the name “Chapter 1 expanded” and make sure the view is a public view
- Now that the view is saved, click on the name and select Edit current view to open the overly exciting old-fashioned “Edit View”-interface
- Make sure that the Name, Title, ChapterOrder and PageOrder columns are visible, all other columns will not be shown once the view format is applied.
- Sort the pages by ChapterOrder and PageOrders, both ascendingly.
- Filter on the two columns ChapterOrder and PageOrder
- PageOrder is equal to 0
This will make sure we select all the chapter-pages
Or - ChapterOrder is equal to 1
This number indicates which chapter needs to be expanded. This is also the only change between the different “Chapter # expanded” views.
- PageOrder is equal to 0
- Click on OK
After the view is created it is time to apply the correct view-format. The JSON below is the same for every “Chapter # expanded” view, so if you decide to change the look-and-feel, you only have to copy-paste the whole code into every view.
- JSON
- Tell me how
{
  "$schema": "https://developer.microsoft.com/json-schemas/sp/view-formatting.schema.json",
  "hideSelection": true,
  "hideColumnHeader": true,
  "rowFormatter": {
    "elmType": "a",
    "attributes": {
      "href": "= @currentWeb + '/SitePages/' + [$FileLeafRef]",
      "title": "[$Title]"
    },
    "style": {
      "text-decoration": "none"
    },
    "children": [
      {
        "elmType": "div",
        "_comment_": "Main Div",
        "attributes": {
          "class": "ms-borderColor-white"
        },
        "style": {
          "display": "flex",
          "flex-wrap": "wrap",
          "align-items": "stretch",
          "flex-direction": "row",
          "padding": "0",
          "margin-bottom": "2px",
          "min-width": "99%%",
          "max-width": "930px",
          "border-width": "1px",
          "border-style": "solid",
          "cursor": "pointer"
        },
        "children": [
          {
            "elmType": "div",
            "_comment_": "Title div",
            "attributes": {
              "class": "=if( [$PageOrder] == 0 , 'ms-bgColor-themePrimary ms-fontColor-neutralLighter ms-borderColor-neutralLight--hover', 'ms-bgColor-themeLighterAlt') + ' ms-bgColor-themePrimary--hover ms-borderColor-themePrimary  ms-borderColor-neutralLight--hover ms-fontColor-neutralPrimary ms-fontColor-neutralLight--hover'"
            },
            "style": {
              "flex-grow": "1",
              "display": "flex",
              "flex-direction": "row",
              "flex-wrap": "nowrap",
              "align-items": "left",
              "width": "230px",
              "padding-top": "5px",
              "padding-bottom": "5px",
              "padding-left": "7px",
              "margin-left": "=if( @rowIndex == 0 ,'0','28px')",
              "border-width": "1px",
              "border-style": "solid",
              "border-radius": "0.2em"
            },
            "children": [
              {
                "elmType": "span",
                "style": {
                  "padding": "7px",
                  "font-size": "14px",
                  "padding-left": "=if([$PageOrder] == 0 , '0', '14px')"
                },
                "attributes": {
                  "iconName": "=if(@rowIndex == 0 , 'HomeSolid',if([$PageOrder] == 0 , 'BulletedTreeList', ''))"
                }
              },
              {
                "elmType": "span",
                "txtContent": "=[$Title]",
                "style": {
                  "display": "=if([$Title] == '', 'none', 'block')",
                  "font-size": "16px"
                }
              }
            ]
          }
        ]
      }
    ]
  }
}
- Select and copy the code on the JSON-tab
- In your Site pages library, select the “Chapter 1 expanded” view
- Click on the view name and choose Format current view
- Select the Advanced mode
- Replace the existing code with the copied code from step 1
- Click on the button Save
Embed the list on a page
To ultimate step is of course to embed the list on our pages. And to do this you mainly have to remember that we are not working on a list but in the actual Site pages library.
- Add the Document library webpart
- Tell me how
Webpart: Document Library
- Document Library: “Site Pages”
- View: “Chapter 1 expanded
- Size: Autosize – fit to number of items
- Hide command bar: yes
- Hide “See all” Button: yes
- Put your page in the editing mode.
- Add the Document library webpart.
- Select “Site pages” from the list with all available libraries
- Once selected, you can select the view “Chapter 1 expanded” from the options panel
- Choose the following setttings:
- Size: Autosize – fit to number of items
- Hide command bar: yes
- Hide “See all” Button: yes
- Click on Apply
- Enter a title for the webpart like for example “Menu”.
The default is the name of the library “Site pages”. Unfortunately, the title-area cannot be removed. - Click on Publish or Republish to publish your page.
Some thoughts…
- When you add new pages. the easiest thing to do is to create a copy of an existing page. This way you do not have to insert the webpart over and over again.
- When you change the order of the pages in Site pages library using the Grid view, don’t forget to republish your pages.
- Currently the page titles are used in the menu, you could opt for creating an additional column ShortTitle with a shorter version of the title. This way you can make sure that menu items don’t use multiple lines.
- I do not see a way to change the look-and-feel of the current page.
I apologize for highjacking this post to ask about a different post but I was unable to find the comment section in the other listing. My question is related to the “Apply a Gantt Chart view in SharePoint” post. I would like to ask if you know how to add the scroll feature to the Gantt chart formatting? I am still learning on to use JSON code with SharePoint and I cannot figure out how to do this. Thank you for your support and for sharing the great modification ideas.
Hi William,
What kind of scroll feature are you referring to?
Do you want to lock the first row for example? Because would not be possible as far as I can see.
Point is we can’t actually change the column headers. What we do in these types of views.
Geert
I also had a comment about the Gantt chart view. It was very useful, but there is a small error in the JSON formatting. Everywhere that says:
=if( [$Progress] == 1
doesn’t work with percentage type column. The only way I could get it working was with, eg:
=if( [$Progress.displayValue] == ‘100%’
thanks again
Hi Lucas,
It actually works that way in my environment, but your way of doing things is certainly not wrong either.
Geert