
SharePoint column formatting is easy to use when you rely on the predefined settings and becomes a bit more tricky when you start copy-pasting from Github.
But once you master the JSON code yourself, it becomes a even more interesting and exciting world.
What do you need to write the code
Not much, any plaintext-editor like Notepad will work. Though once you get started for real, you probably want to work in Notepad++ or Visual Studio Code.
Concepts
The code is using JSON (Wikipedia) to structure the HTML and CSS codes.
Thats right, we are basically just writing HTML and CSS, but we structure this in JSON data-objects.
- The HTML-attributes and CSS is always added as a Attribute-Value-pair or Name-Value-pair
- And each object groups all its information (Attributes-Value) in enclosing curly brackets: { }
Example
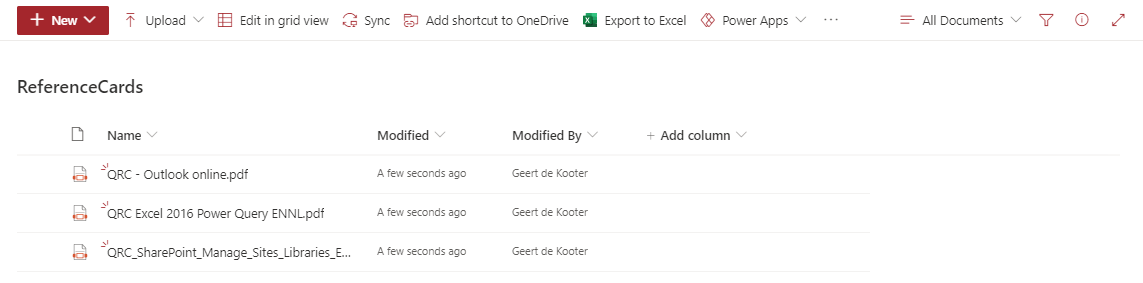
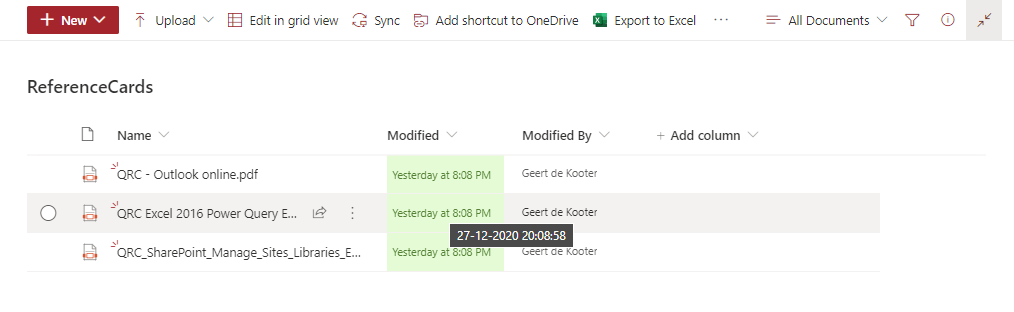
We will start the examples by changing the display of some basic columns. So let’s fire up a library with some documents.
I have created a library “ReferenceCards” and uploaded a few files.
Make sure that you are not bothering your colleagues. We are creating column formatting, and column formatting is applied to well … the column.
So anyone looking at and using the column will be impacted.
This is a huge difference with view formatting, since view formatting is applied to the view only.
Let’s code
As so very often, the first line in the code starts with identification of the schema that needs to used. A small difference here if you write code for SharePoint Online or SharePoint 2019 (previous versions do not support column formatting).
SharePoint Online:
https://developer.microsoft.com/json-schemas/sp/v2/column-formatting.schema.json
SharePoint 2019:
https://developer.microsoft.com/json-schemas/sp/v1/column-formatting.schema.json
In my Notepad I write the code below, referring to v2 since I will use SharePoint Online:
{
  "$schema" : "https://developer.microsoft.com/json-schemas/sp/v2/column-formatting.schema.json"
}
Obviously , that wouldn’t do anything. So we add a comma, and indicate we want the data to be displayed in a HTML div-element, using the attribute “elmType” and the value “div”:
Attributes, functions and some of the special string values are CASE sensitive.
So you really should write “elmType” and NOT “elmtype”.
{
  "$schema" : "https://developer.microsoft.com/json-schemas/sp/v2/column-formatting.schema.json",
  "elmType" : "div"
}
This would create an empty div, since we didn’t identify the contents we would like to display.
So we add another comma, and tell what kind of contents needs to be included, using the attribute “txtContent” and any fixed value you like for example “Hello World”.
{
  "$schema" : "https://developer.microsoft.com/json-schemas/sp/v2/column-formatting.schema.json",
  "elmType" : "div",
  "txtContent" : "Hello World"
}
Okay, now copy your code from Notepad and head over to the column to which you want to apply this basic code.
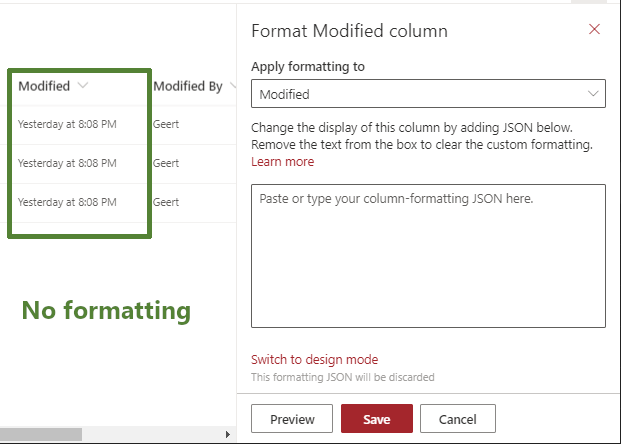
- Click on the column header of the column Modified, and select Column settings / Format this column
- Ignore the graphical interface and click on Advanced mode.
- Paste your code in the textbox
- Click on Preview, to see what kind of a monster you have created.
I don’t really think you want to save at this point. 🙂
- “div” is not the only tag you can use, other supported elmTypes are:
- div
- span
- a
- img
- svg
- path
- button
- You can not apply column formatting on the Filename-column in document libraries.
- And the following column types can not be formatted (also check the official list of supported column types):
- Filename (in Document Libraries)
- Retention Label
- Sealed columns
- Multi-Line Text column with enhanced rich text
“Hello world”, as beautiful as it is, is not the obvious text you want to display in a column.
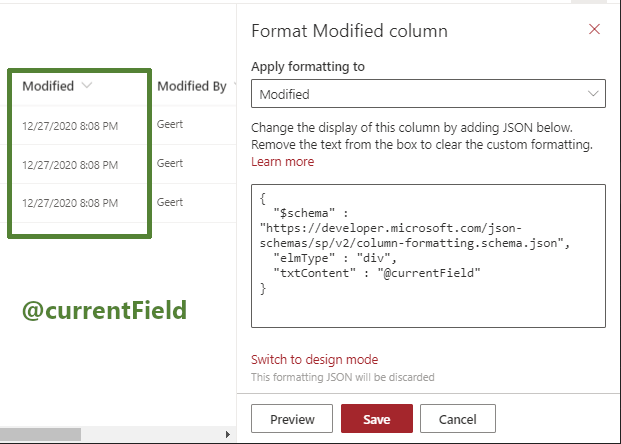
Instead of a fixed text we most of the time want to refer to the value of the field itself. To do this, we replace “Hello World” by “@currentField“.
{
"$schema" : "https://developer.microsoft.com/json-schemas/sp/v2/column-formatting.schema.json",
"elmType" : "div",
"txtContent" : "@currentField"
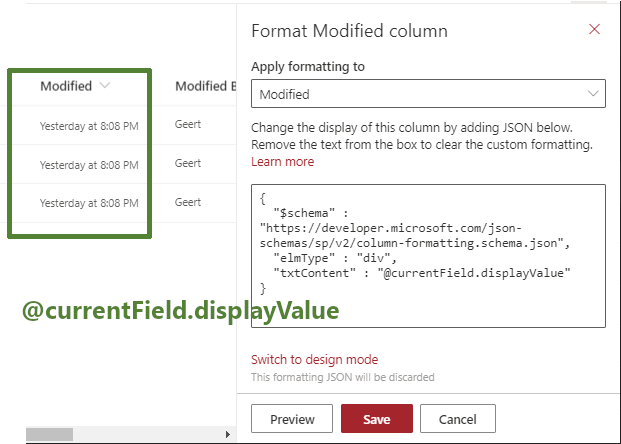
}To state the obvious @currentField takes the value of the current field. In the example of the column “Modified” we see something (un)expected happening, the default “friendly format” of the date disappears and that the actual date is shown instead.
This is not a bad thing, but not always what you want, so if you rather see the “friendly format” use @currentField.displayValue.
This technique can be used with several column types.
| Single-Value Field Types | @currentField | @currentField.displayValue |
|---|---|---|
| Single line of Text | Hello world | |
| Multiple lines of Text (Plain text) | Just a lot more text | |
| Choice | Blue | |
| Number | 12567,89 | 12.567,89 |
| Yes/No | true | Yes (translated in the regional language) |
| Date | 04/14/2020 12:00 AM | April 14 (The column is using Friendly format) |
| Currency | 12678 | €12.678,00 |
There are also quite some field types that have multiple values, for example a column of the type hyperlink contains both the link and the text to display and the actual link. For those we need to use something else, but for now we just have to understand that this is the situation, but do check the full lists of properties for each multi-value field type in the core documentation if you can’t wait.
So let’s add “.displayValue” to create the following code
{
  "$schema" : "https://developer.microsoft.com/json-schemas/sp/v2/column-formatting.schema.json",
  "elmType" : "div",
  "txtContent" : "@currentField.displayValue"
}
Please do test you code, and you will quickly realize that we are not really changing anything. We are now simply able to create a custom format that is basically showing the same information and in the same shape as just before.
Adding attributes and format
An HTML tag doesn’t only has a value you see, but also contains additional attributes like for example a title and formatting using CSS.
Let’s add attributes
So get started from the previous code:
- Add a comma after “@currentField.displayValue”
- Type the name “attributes” 🙂
Since we are potentially adding multiple attributes, we open and close the curly brackets { }, and as you can see, I have also included a line break. - Type the first (and for now only) attributes, “title” followed by some text like: “Last modification”
{
  "$schema" : "https://developer.microsoft.com/json-schemas/sp/v2/column-formatting.schema.json",
  "elmType" : "div",
  "txtContent" : "@currentField.displayValue",
  "attributes" : {
                 "title" : "Last modification"
				}
}
This will look the same as before, but when you hover the cursor over the date it will show the words “Last modification”.

Instead of the static text, we could also replace this with the @currentField in order to show the exact date and time.
{
  "$schema" : "https://developer.microsoft.com/json-schemas/sp/v2/column-formatting.schema.json",
  "elmType" : "div",
  "txtContent" : "@currentField.displayValue",
  "attributes" : {
                 "title" : "@currentField"
				}
}
The most common attributes are:
- title
- href
- src
- target
- class
- iconName
and the complete list with all the attributes is also available in the core documentation.
Now let’s add some colours.
Colours, borders, font-size, margins… we are talking CSS here. And to add the CSS formatting we create again name-value pairs, color and #ffee00
so let’s start with the code that we already have created and prepare it for styles.
{
  "$schema" : "https://developer.microsoft.com/json-schemas/sp/v2/column-formatting.schema.json",
  "elmType" : "div",
  "txtContent" : "@currentField.displayValue",
  "attributes" : {
                 "title" : "@currentField"
				},
  "style" : {
				"color" : "#548235",
                "background-color" : "#e5fbd6",
				"padding" : "0 0.5em 0 0.5em"
  			}
}
With this information and your CSS knowledge (?) you can start experimenting on your own columns.
The most interesting use-cases for column formatting use without a doubt conditional formatting, so that will be the topic of the next post.
Have fun !